

共同瀏覽 指示
Windows
-
Click on the Co-Browse button in the bottom right corner of this page and give the Support Agent the numbers you will see.

-
After the Support Agent enters the code in Co-Browse from their side and clicks Connect, you will get a pop-up window in your browser that will request to accept sharing. Click Accept.

If instead of getting the request above you get the request below, click on Yes. The Support Agent will then need to switch to Advanced Mode from their side and then you will get the pop-up window above.

-
This will download an .exe file. Click on it to open when the download is completed.

-
You will see an activation window. Once the activation is completed, the window will minimize itself automatically and the remote session will start in the View mode. In this mode, the Support Agent can't do anything on your computer, not move the mouse or click on anything, they can only see what you are doing from your side.

-
If the Support Agent needs not to just view your screen but to help you fix something on your computer, the session will need to be upgraded to Full Control. After the Support Agent switches the session to Full Control from their side, you will get a pop-up request. Click Yes.

-
The Support Agent should now be able to control the mouse and help you solve your issue.
-
Once the troubleshooting is complete and the Support Agent disconnects the session from their side, you will see the window below. It means that the Support Agent has been disconnected from your computer.

Mac
MacOS Ventura 13.0.1
-
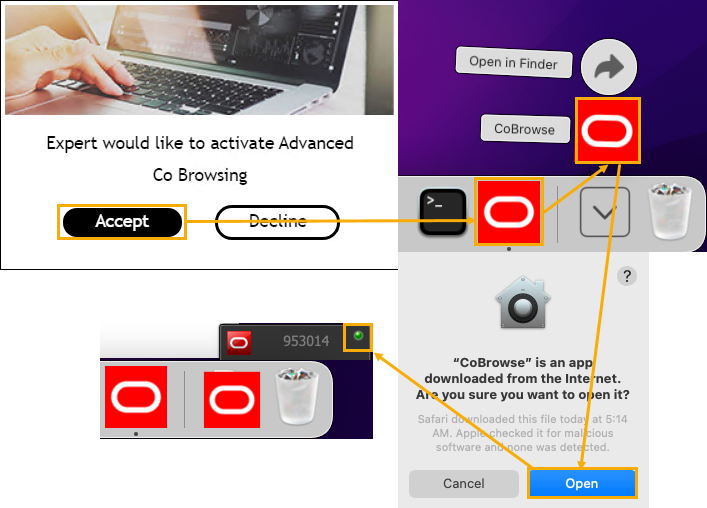
Click on the Co-Browse button in the bottom right corner of this page and give the Support Agent the numbers you will see.
-
After the Support Agent enters the code in Co-Browse from their side and clicks Connect, you will get a pop-up window in your browser that will request to accept sharing. Click Accept.
If instead of getting the request above you get the request below, click on Yes. The Support Agent will then need to switch to Advanced Mode from their side and then you will get the pop-up window above.
-
You might get the request below to approve the download. Click Allow.

-
This will download a zip archive on your computer. Double-click on the file once the download is complete - this will automatically unzip the file and open the Downloads folder. Click on Co-Browse to open the app.

-
You might get the following pop-up window. Click Open.

-
You will get the request to grant screen recording permission to the app (unfortunately, without this, the app won't work). Click Open System Settings.

-
This will open your System Settings and the permission tab that you need to grant. Toggle the permissions On next to CoBrowse. When the credential prompt pops up, enter your Mac password. You will then get a prompt to Quit & Reopen CoBrowse. Click Later.

Note: If the System Settings don't open automatically or you close the window by mistake, you can open them manually by clicking on the Apple icon in the top left corner of your screen and navigating to System Settings > Security & Privacy > Screen Recording.

-
For the Support Agent to be able to control your mouse and not just view your screen, Co-Browse also needs permissions granted for Accessibility. It doesn't say so from the start but if you restart the session it will ask for it. So, to save time, switch to the Accessibility tab, click on the Plus (+) button, find and select the CoBrowse app in the Downloads tab and click Open. This should add the app with the box for permission checked already. Then Quit the CoBrowse app.

-
Repeat step 1 - click on the Co-Browse button in the bottom right corner of this page and give the Support Agent the new numbers you will see.
-
You will get the same request as in step 2 - click Accept. Then open the CoBrowse app from the Downloads and click Open when the pop-up request will appear. This will start the remote session in the View mode (you will see a little green circle in the CoBrowse floating window in the bottom right corner of your screen). In this mode, the Support Agent can't do anything on your computer, not move the mouse or click on anything, they can only see what you are doing from your side.

-
If the Support Agent needs not to just view your screen but to help you fix something on your computer, the session will need to be upgraded to Full Control. After the Support Agent switches the session to Full Control from their side, you will get a pop-up request. Click Yes.
-
The Support Agent should now be able to control the mouse and help you solve your issue.
-
Once the troubleshooting is complete and the Support Agent disconnects the session from their side, you will see the window below. It means that the Support Agent has been disconnected from your computer.

Mac OS Monterey 12.4
-
Click on the Co-Browse button in the bottom right corner of this page and give the Support Agent the numbers you will see.
-
After the Support Agent enters the code in Co-Browse from their side and clicks Connect, you will get a pop-up window in your browser that will request to accept sharing. Click Accept.
If instead of getting the request above you get the request below, click on Yes. The Support Agent will then need to switch to Advanced Mode from their side and then you will get the pop-up window above.
-
You might get the request below to approve the download. Click Allow.
-
This will download the Co-Browse app on your computer and the Co-Browse logo will appear in the right corner of your Dock. Click on the logo and then on Co-Browse to open the app.

-
You will get the window below. Click Open.

-
You will get the request to grant screen recording permission to the app (unfortunately, without this, the app won't work). Click Open System Preferences.

-
This will open your System Preferences and the permission tab that you need to grant. Click on the padlock button and enter your Mac password to be able to make the changes.

Note: If the System Settings don't open automatically or you close the window by mistake, you can open them manually by clicking on the Apple icon in the top left corner of your screen and navigating to System Settings > Security & Privacy > Privacy.

-
Once the Permissions are unlocked, check the box for CoBrowse. You will get a pop-up window that will tell you that you need to restart the app for it to work. Click Later.

-
Co-Browse also needs permissions granted for Accessibility and Full Disk Access. It doesn't say so from the start but if you restart the session it will ask for it. So, to save time, switch to the Accessibility tab, click on the Plus (+) button, find and select the CoBrowse app in the Downloads tab and click Open. This should add the app with the box for permission checked already. Then switch to the Full Disk Access tab and do the same. After you add the permission for Full Disk Access, you will again get the pop-up window that will tell you that the app needs to be restarted. Click Quit & Reopen this time.


-
Repeat step 1 - click on the Co-Browse button in the bottom right corner of this page and give the Support Agent the new numbers you will see.
-
You will get the same request as in step 2 - click Accept. Then open the CoBrowse app from the dock and click Open when the pop-up request will appear. This will start the remote session in the View mode (you will see a little green circle in the CoBrowse floating window in the bottom right corner of your screen). In this mode, the Support Agent can't do anything on your computer, not move the mouse or click on anything, they can only see what you are doing from your side.
-
If the Support Agent needs not to just view your screen but to help you fix something on your computer, the session will need to be upgraded to Full Control. After the Support Agent switches the session to Full Control from their side, you will get a pop-up request. Click Yes.
-
The Support Agent should now be able to control the mouse and help you solve your issue.
-
Once the troubleshooting is complete and the Support Agent disconnects the session from their side, you will see the window below. It means that the Support Agent has been disconnected from your computer.